Scuba Diving Tips

Category: PADI Open Water Diver Course

Everything you need to know about the PADI Open Water Diver certification.

  • PADI Confined Water Dive 5

    PADI Confined Water Dive 5

    The PADI Confined Water Dive 5 is the final dive of your confined water training sessions. Successfully completing β€‹PADI Confined Water Dive 5 will get you ready for the real open water dive of the PADI Open Water course.

    PADI Confined Water Dive 5
    PADI Confined Water Dive 5

    During this dive you will finishing a few scuba skills before learning how to plan and execute a mini dive. This is one of the most exciting parts of all the PADI Confined Water Dives as it truly prepares you for more realistic diving circumstances.

    PADI Confined Water Dive 5 – Mini Dive

    What is this mini dive all about? Is it a scuba skill? Not only do new divers ask this question, but also some diving instructors.

    The mini dive is one of the best changes in the 2013 revised PADI open Water Course. During this part you really focus on learning how to plan a dive, give a briefing, do your own descent and swim around in confined water repeating some of the previous skills in like a scenario. In the end of your PADI Confined Mini Dive you will make an ascent and exit the water.

    This is the performance requirement of the PADI Instructor Manual:​

    Complete a simulated dive – Minidive – including:

    • Plan dive with a buddy.
    • Make an entry and exit.
    • Do a weight and trim check.
    • Perform a five-point descent.
    • With a buddy, practice previously learned skills
    • with emphasis on neutral buoyancy, hovering and swimming.

    Demonstrate awareness and make efforts to avoid contact with simulated sensitive bottom and fragile aquatic organisms.

    PADI Confined Dive 5 Skills

    Mini Dive Explanation:

    Watch this video of the full PADI Confined Water Dive 5:

    Please SUBSCRIBE to our Scuba Diving Tips YouTube Channel

    Time to own your own Scuba Gear

    Congratulations with completing the PADI Confined Water Dive 5! You are now a better scuba diver and you are ready for the real open water dives! This is a big step and owning your full scuba dive gear will make your open water scuba experience so much better. Below we listed some of the best scuba gear item to have on your dives:

    HD Pro BCD Aqua Lung

    HD Professional BCD Aqua Lung

    X-Vision Liquid Skin Mask Mares

    X-Vision Liquid Skin Mask Mares

    Seawing Fins Scuba Pro

    Seawing Flex Fins Scuba Pro

    Galaxy Rash Guard Aqua Lung

    Galaxy Rash Guard Aqua Lung

    D5 Suunto Dive Computer

    D5 Suunto Dive Computer

  • Fin Pivot – How To Establish Neutral Buoyancy

    Fin Pivot – How To Establish Neutral Buoyancy

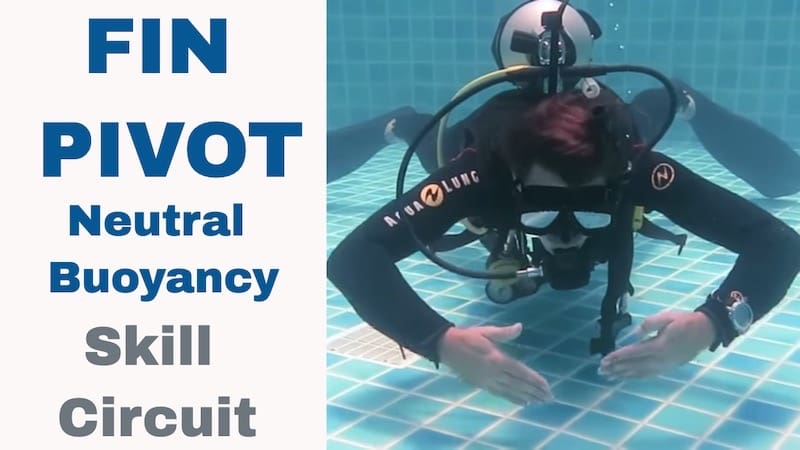
    The Fin Pivot is one of the oldest techniques that you can use to practice controlling your buoyancy with your lungs. It is very important to have great buoyancy while scuba diving and try to use our lungs as the main part to control that buoyancy. The Fin Pivot is perfect to learn to use your lungs the right way in the beginning or your scuba diving lessons.

    Fin Pivot Skill
    Fin Pivot – PADI Open Water Diver Course

    Is the Fin Pivot an out of date skill?

    The Fin Pivot used to be a performance requirement in the PADI Open Water Diver Course. Some years ago PADI updated standards and made it a flexible technique to choose when practicing buoyancy with your students. 

    The reason for this was because many people had what we call floaty ankles. This made it very hard on them to perform this scuba diving skill. So now it is optional to teach the Fin Pivot in the Open Water course. If you choose not to teach the Fin Pivot, then you need to replace it by another buoyancy technique like for example hovering.

    Steps for the PADI Fin Pivot Skill

    1. Make sure you are fully deflated

    2. Lay flat on your belly

    3. Spread your legs and try to stretch them

    4. Inhale and see if you start to rise

    5. If not than add a little bit of air into your BCD by using the inflator button of your LPI

    6. Take another deep breath (if you still don’t rise, then repeat the steps before)

    7. When you inhale you should start to rise

    8. When you start rising start exhaling as there is a delay in buoyancy and the size of your lungs

    9. try not to kick, scull and do “push-ups” with your hands​

    10. Be streamlined and only rise and fall using your lungs

    Important: Make sure the when you perform the Fin Pivot that your fins are not touching any aqua life.

    Have a look at this video we made for the Fin Pivot skill:

    Please SUBSCRIBE to our Scuba Diving Tips YouTube Channel

    How to solve β€‹floaty ankles when Scuba Diving?

    Floaty ankles can be an annoyance while scuba diving. Especially if you try to perform the PADI Fin Pivot Skill. To solve floaty ankles we recommend you to purchase heavy fins and/or ankle weights. Have a look at these two items:

    Scuba Pro Jet Fins

    Scuba Pro Jet Fins

    Trident Ankle Weights

    Trident Ankle Weights

    Next Skill: CESA – Controlled Emergency Swimming Ascent

    Frequently Asked Questions About the Fin Pivot in Scuba Diving

    What is the Fin Pivot in scuba diving?

    The Fin Pivot is a foundational technique used in scuba diving to practice and understand buoyancy control. By lying prone on the bottom and using controlled breathing, divers learn to rise and fall gently, achieving neutral buoyancy. This exercise emphasizes the role of lung volume in buoyancy adjustments.

    Why is mastering the Fin Pivot important for divers?

    Mastering the Fin Pivot helps divers develop precise buoyancy control, leading to:

    • Reduced air consumption.
    • Minimized contact with the aquatic environment, preserving marine life.
    • Enhanced comfort and control underwater.

    It lays the groundwork for more advanced skills like hovering.

    Is the Fin Pivot still a required skill in PADI courses?

    While the Fin Pivot was once a mandatory skill in the PADI Open Water Diver course, it has become optional in recent years. Instructors may choose to teach it or substitute it with other buoyancy exercises like hovering, depending on student needs and course structure.

    What are the steps to perform the Fin Pivot correctly?

    1. Fully deflate your BCD.
    2. Lie flat on your stomach on the bottom.
    3. Extend your legs with fins touching the ground.
    4. Inhale deeply; your upper body should rise.
    5. Exhale slowly; your body should lower back down.
    6. Avoid using hands or kicking; rely solely on breath control for movement.

    How does the Fin Pivot differ from hovering?

    The Fin Pivot involves maintaining contact with the bottom, using fins as a pivot point, and focusing on vertical movement through breathing. Hovering requires maintaining a stationary position mid-water without any contact, demanding more advanced buoyancy and trim control.

    What equipment can assist with performing the Fin Pivot?

    Divers experiencing “floaty ankles” can benefit from:

    • Heavy fins: Such as ScubaPro Jet Fins, which help anchor the legs.
    • Ankle weights: Like Trident Ankle Weights, to counteract buoyant tendencies in the lower body. scubadivingtips.net

    Can the Fin Pivot be practiced in all diving environments?

    The Fin Pivot is best practiced in controlled environments like pools or sandy bottoms where contact won’t harm marine life. In sensitive ecosystems, divers should avoid bottom contact and focus on mid-water buoyancy exercises to prevent environmental damage.

    How does mastering the Fin Pivot benefit overall diving skills?

    Proficiency in the Fin Pivot enhances a diver’s ability to control buoyancy using breath, leading to improved air efficiency, better positioning in the water column, and a foundation for advanced techniques like hovering and precise maneuvering.

    Are there visual resources to learn the Fin Pivot?

    Yes, visual demonstrations can be highly beneficial. For instance, the “Fin Pivot – PADI Open Water Diver Course” video provides a clear demonstration of the technique seen above shows this or watch the full PADI Open Water Skills video:

  • Giant Stride Entry

    Giant Stride Entry

    ​The Giant Stride entry is one of the safest and most comfortable entries when you are scuba diving from a bigger boat. It depends on the size and hight of a boat what entry you choose. The Giant Stride entry is one of the best options especially if you are nervous to enter the water for the first time.

    Giant Stride
    Giant Stride Entry

    Usually when you scuba dive from the beach we just walk into the water using the sloping bottom contour. When we dive from a small boat we roll backwards into the water or put the dive equipment on in the water. When we are on a larger boat the some people prefer to enter backwards, however we found out that in most cases the Giant Stride Entry is much better.​

    You first will practice the Deep Water Entry in the PADI Open Water Course. Many Diving Instructors like to teach the Giant Stride in confined water first.  

    How to do a Giant Stride Entry

    1. Add air into your BCD (70%ish full)

    2. Stand on the side of the pool or boat, with your toes on the side and your fins going over

    3. Put your left hand on your weight belt and hold the buckle (if you have a weight belt)

    4. Make sure you have your scuba mask on you face and your regulator in your mouth

    5. With your right hand hold your regulator and mask in place (regulator in the palm of your hand and 2 fingers on your scuba mask

    6. Look down and check if nothing is in the water and you are clear to enter

    7. When everything is ok, look straight forward to the horizon 

    8. Make a big step (not jump) forward (Giant Stride) into the water

    9. When you surface keep holding the regulator into your mouth and you scuba mask on your face

    10. first fully inflate the BCD

    11. Then you can take out your regulator (remember mouth piece down) 

    12. Switch to your snorkel

    13. Give an ok signal to anyone that looked after you entering the water

    14. Swim away so other scuba divers can also enter the water

    Check out the Giant Stride skill video:

    Please SUBSCRIBE to our Scuba Diving Tips YouTube Channel

    In this video we used the Scuba Pro Jet Sport Fins. These fins are a personal favourite of mine. They are very light for traveling, very easy to put on and most important they are extremely comfortable to move around with underwater. Check them them out on Amazon below:

    Jet Sport Fins - Scuba Pro

    Jet Sport Fins – Scuba Pro

    Next Skill: BCD Inflate & Deflate

    Frequently Asked Questions About the Giant Stride Entry

    What is the Giant Stride entry in scuba diving?

    The Giant Stride is a common water entry technique used in scuba diving, especially from stable platforms like boats or docks. It involves taking a large step forward into the water while wearing full scuba gear, ensuring a controlled and safe entry.

    How do I perform a Giant Stride entry correctly?

    To execute a Giant Stride entry:

    1. Inflate your BCD to about 70% to ensure buoyancy upon entry.
    2. Stand at the edge of the platform with your toes overhanging and fins extending beyond the edge.
    3. Place your right hand over your regulator and mask to keep them in place.
    4. Use your left hand to secure your weight belt buckle or the back of your head to hold the mask strap.
    5. Look straight ahead to maintain balance and orientation.
    6. Take a large step forward, ensuring your legs are in a scissor position during the descent.
    7. Upon surfacing, fully inflate your BCD, switch to your snorkel if desired, and signal to the boat crew that you’re okay.

    Why is the Giant Stride entry preferred in certain situations?

    The Giant Stride is favored when entering deep water from stable platforms because it allows divers to enter the water smoothly and maintain control. It’s especially useful when the entry point is elevated, as it helps prevent contact with the platform or boat.

    Are there common mistakes to avoid during a Giant Stride entry?

    Yes, common mistakes include:

    • Failing to check the entry area for obstacles or other divers.
    • Not securing the mask and regulator, leading to potential dislodging upon impact.
    • Insufficient BCD inflation, which can result in sinking below the surface.
    • Looking down during the step, which can affect balance and orientation.
    • Not stepping out far enough, risking contact with the platform or boat.

    Can the Giant Stride entry be used in all diving environments?

    No, the Giant Stride is best suited for entries from stable, elevated platforms into deep water. In environments with unstable platforms, shallow water, or when diving from small boats, alternative entry methods like the back roll or seated entry may be more appropriate.

    Is the Giant Stride entry taught in scuba certification courses?

    Yes, the Giant Stride is commonly taught during scuba certification courses, such as the PADI Open Water Diver course. It helps students learn proper entry techniques and build confidence in entering the water with full gear.

    What equipment considerations are there for the Giant Stride entry?

    When performing a Giant Stride, ensure:

    • Fins are properly secured to prevent loss upon entry.
    • All gear is streamlined to minimize drag and potential entanglement.
    • Loose accessories are stowed or secured to prevent them from catching on the platform or boat.

    Are there visual resources to learn the Giant Stride entry?

    Yes, visual demonstrations can be highly beneficial. For instance, the “How To | Giant Stride” video seen above provides a clear demonstration of the technique.

  • Buddy Check Diving πŸ‘Œ BWRAF

    Buddy Check Diving πŸ‘Œ BWRAF

    The Buddy Check Diving is a check we do every time before we go scuba diving. It is easy to remember the steps for the buddy check by using the scuba acronym BWRAF. 

    You learn the Buddy Check BWRAF during your PADI Open Water Diver Course. This is such and important skill that you will practice it many times. You will practice the Buddy Check diving skills on PADI Confined dive 1, 2, 3, 4 and 5 and all the 4 PADI open water dives.

    The scuba acronym BWRAF stand for: BCD, Weight System, Releases, Air and Final OK.  

    Buddy Check Diving BWRAF
    Buddy Check Scuba Diving – BWRAF

    Steps for the PADI Buddy Check Scuba Diving BWRAF:

    1. First we need to test each others BCD’s 

    2. Using the LPI button, start inflating your buddy’s BCD (you can do this at the same time to save some time

    3. Once you are sure the power inflator works and your buddy’s BCD is not leaking, then deflate the BCD.

    4. Next step for the Buddy Check in Scuba Diving is to Orally inflate each others BCD, this time a few breaths will be enough as you already tested for leaks before.

    5. After checking the BCD, check the weight system, making sure nothing is entangled, streamlined, no weights are missing and that the weight system quick release mechanisms works properly  

    6. Then check the releases on your buddy’s dive equipment, no entanglement, all releases secure, especially check your Buddy’s Cylinder Band / Strap to prevent a loose cylinder band

    7. After that, the most important part of the buddy check scuba diving is checking your buddy’s Air

    8. First make your you Buddy’s Air is fully open (Double check which way is open and close on the side of the turn valve)

    9. After you both checked each others tank valve, grab your regulators and purge, smell and breath from them while looking at your SPG (When you breath the pressure gauge needle should NOT move)

    10. Then check the alternate air source on each other for the Buddy Check

    11. Finally the Final OK in the Buddy Check, which means fully check all the dive equipment, do we have fins, a scuba mask, snorkel, are all hoses streamlined… If all good then give the Final OK to your Buddy and then we are ready to Scuba Dive!Check out this video for the PADI Buddy

    Check. The video is with a voice over, so don’t forget to put the sound on πŸ”ˆ

    Please SUBSCRIBE to our Scuba Diving Tips YouTube Channel

    It is easier to do the buddy check if you and your buddy have their own full set of diving equipment. Also knowing that the dive equipment has not been used by so many others is much more hygienic. There are many good set’s of dive gear. But check out this Aqualung dive gear package:  

    We have made a second video that explains how to perform the BWRAF scuba in a demonstration level for the PADI Divemaster and PADI Dive Instructor course:

    Next skill: Giant Stride Entry

  • How To Clear a Fully Mask While Scuba Diving

    Knowing How To Clear a Fully Flooded Mask Underwater ​can help you to solve a foggy mask underwater or clear the mask if it ever get’s flooded on a scuba dive. It is very rare for a scuba mask to fully flood on a dive and even rarer remove your mask underwater. It can happen however, so it is important that we practice the Fully Flooded mask skill in the PADI Open Water Diver course.

    How Clear a Fully Flooded Mask
    Clearing a Fully Flooded Mask

    It’s is best the practice clearing the fully flooded mask after you mastered the partially flooded mask skill in the PADI Open Water Diver course. The PADI Fully Flooded Mask skill is part of PADI Confined Water Dive 2. The performance requirement in the PADI Instructor manual states:

    Clear a fully flooded mask.

    Steps for the How to clear the PADI Fully Flooded Mask skill

    1. Fully flood the scuba mask by pulling down the top of the frame

    2. Touch the top of the frame with your fingers

    3. Breath into your mouth 

    4. Breath out of your nose while gently looking up

    5. If there is still a bit of water in the mask then repeat the previous steps

    6. Until the scuba mask is clear from waterCheck out this Fully Flooded Mask Skill Video:

    Please SUBSCRIBE to our Scuba Diving Tips YouTube Channel

    The trick with this skill is to not overthink it. Stay calm, breath in slowly and exhale though the nose while looking up. The skill can be very handy when you get a bit of a foggy mask while scuba diving. To prevent a foggy mask from happening we recommend you to use toothpaste or spit into your mask before the dive. Would you like to know more about how to teach the mask skills as a PADI Diving Instructor than check this article.

    Check out the mask below that we recommend as one of the softest latex/seal, making mask clearing very easy:

    Mares Liquid Skin Mask

    Next Skill: Mask Removal, Replacement and Clearing

  • How to release a cramp underwater while scuba diving

    How to release a cramp underwater while scuba diving

    This Cramp Release Scuba Diving Skill video explains in an easy way how to remove a cramp while scuba diving underwater for the PADI Open Water Diver Course. Marcel van den Berg a highly awarded PADI Platinum Course Director shows you on a PADI Open Water Diver Course student level how to perform the Cramp Release Scuba Diving Skill.

    Cramp Release Underwater
    Cramp Release Underwater

    Steps for the PADI Cramp Release Scuba Diving Skill

    1. Signal to your buddy that you have a cramp in your leg

    2. Grab (or let your scuba diving buddy grab) the top of your fin

    3. Stretch your leg, while pulling back the top of your fin

    4. Balance yourself with your other arm

    5. You can also massage your calf

    Check out the PADI Cramp Release Scuba Diving Skill for the PADI Open Water Diver Course in this video:

    How to prevent a cramp

    At Scuba Diving Tips we highly recommend you to invest is good fitting fins that feel comfortable. We have done a lot of research and found out that we want to recommend these tree fins to lower the risk of a cramp while scuba diving underwater.

    The Mares Quatro, The Scuba Pro Jet Sports, and the Scuba Pro Sea Wings are our best recommendations to prevent Cramps in your leg while Scuba Diving or Snorkeling.​

    Check out these amazing fins here:

    Jet Sport Fins

    Jet Sport Fins

    Quatro Fins

    Quatro Fins

    SeaWing Fins

    SeaWing Fins

  • PADI Loose Cylinder Band Skill

    PADI Loose Cylinder Band Skill

    The PADI Loose Cylinder Band (also called Loose Tank Strap) skill is a great skill to learn as it sometimes happens that the Scuba Cylinder Band gets loose. It is very unlikely that it happens, but if it does, it is usually because of entering the water or lousy preparation before the dive. 

    New scuba divers will learn this skill as part of the dive flexible skill in confined water during the PADI Open Water Diver course.

    Getting a loose cylinder band during the dive is unlikely, but if it does happen it can cause some uncomfortable moments underwater, you look a bit silly, and in some cases, it might even become dangerous, because of entanglement issues or loss of trim.

    The Loose Cylinder Band Skill is now also part of Skill Circuit of the New Revised PADI IDC Course.

    Loose Cylinder Band
    PADI Loose Cylinder Band Skill in Confined Water

    First of all notice the Loose Cylinder Band Tank Strap. Then make contact and signal your buddy that the band is loose and that you will re-secure it. Then depending on the type of band (strap) make sure it’s tight, hold it with two hands and if appropriate use you knee the get the cylinder back in place.

    Make sure that the band is at least 4/5 fingers from the top (curvature) of the cylinder and that it is turned the right way. You can check this by making sure that the first stage is parallel to the BCD handle or backplate.

    Then finally double-check everything, that nothing is entangled, everything is streamlined and then communicate with your diving buddy that everything is ok and you can continue the dive.Check out the PADI Loose Cylinder Band (Tank Strap) video below:

    How to perform the PADI Loose Cylinder Band or Loose Tank Strap skill

    Please SUBSCRIBE to our Scuba Diving Tips YouTube Channel

    We recommend you to get a good BCD with a high quality Strap to secure your Tank. Most BCD’s these day’s have great quality straps, but the ScubaPro And Aqualung BCD have Single tank band system allows for easier assembly and Super Cinch tank buckle system locks the tank in solid for maximum stability. We recommend these two models:

    Scuba Pro Glide

    Scuba Pro Glide

    Aqua Lung Pro BCD

    Aqua Lung Pro BCD

    Next Skill: Weight Belt Removal and Replacement Underwater

  • PADI Mask Removal, Replacement and Clearing Skill

    PADI Mask Removal, Replacement and Clearing Skill

    The PADI Mask Removal, Replacement and Clearing skill is for some people the hardest skill to complete in the PADI Open Water Diver Course. On the other hand it also gives a great feeling of accomplishment after mastering the PADI Mask Removal, Replacement and Clearing skill.

    Some new scuba divers have absolutely no issues with the Mask Removal and Clearing skill, while other struggle a bit controlling breathing through their mouths. The trick is when you remove the mask from your face to breath through your mouth only. Some people get stressed and then they accidentally breath through their nose, resulting in water entering the throat and potential coughing. 

    mask removal replacement and clearing skill
    Mask Removal and Replacement performed on the knees

    Teaching the Scuba Mask Removal on the Knees or Neutrally Buoyant?

    Some Dive Instructors prefer to teach this skill in a more neutral buoyancy position compared to kneeling. We believe that Babies should first learn how to crawl before the walk, and it is maybe a bit more relaxer to learn this skill kneeling and then repeat it later in a neutrally buoyant position. But it depends on many factors and your Dive Instructor can decide. Check out this whole article we wrote about Neutrally Buoyant VS Kneeling.

    PADI Mask Removal and Replacement Neutrally Buoyant
    Mask Removal and Replacement performed neutrally buoyant

    There are many different tricks and styles to learn how to Remove Replace and Clear your scuba mask. You PADI Dive Instructor and Divemaster will help you to learn these. If you are a Dive Instructor or Divemaster and you want to learn more on How To Teach The Mask Removal and Replacement than check this article.

    Tips for the PADI Mask Removal and Replacement Skill

    Tip 1: Stay Calm, the more relax you are, the more easy this skill will be.

    Tip 2: Don’t overthink it! In the end it’s just about breathing in a calm manner through your mouth and when you replace you mask through your nose to clear it.

    Tip 3: Just before you take of the scuba mask pretend that you are about to stick your face in the shower, go under in a bath tub or go for a swim. Most of you have done these things and with all of them your face will be enclosed in water. What will you automatic reaction be? To not breath into your nose, this is the same with the PADI Mask Removal, Replacement and Clearing skill.  Many scuba divers get stressed because they think that this is new and weird, but many of you have already experienced being enclosed in water before. Actually it’s kinda nice in the shower, no? 

    Tip 4: Do the mask removal and clearing slowly. This will give you time to think about the next step. The steps for this skill are explained below on this page.

    Tip 5: Try to see it as a cool skill to instead of a scary one. This will help you to open up for learning the Mask Removal and Replacement skill.

    Tip 6: Don’t give up! Most people can do the PADI Mask Removal skill in one go, but some people need a bit more tries. This is ok! You got all the time in the world and you will first be practicing this skill in the shallow end of confined water. This means that if anything goes wrong, or you don’t like it you can just stand up, easy! Then calm down a bit, think and give it another try. After a few tries (repetition makes perfect) you should get the hang of it. Then when you are comfortable with the PADI Mask Removal, Replacement and Clearing skill you can move onto the next scuba diving skill.

    How to perform the PADI Mask Removal and Replacement skill

    1. Take off your mask with the left hand

    2. With the right hand take off the strap

    3. Then take off the mask and snorkel from your face

    4. Make sure that you hold onto it, and you don’t drop it

    5. Then make sure the snorkel is on the side and feel the nose pocketSo the mask is not upside down6. Move the strap away and take your hairs out of the away

    7. First, put the mask on your face

    8. Then put the strap all around and make sure it is not twisted and the strap is high above your ears

    9. Double-check that everything is OK,

    10. With two fingers touch the top frame of your mask

    11. Breath in through your mouth and out through your nose while gently looking up until all the water is removed from the mask.

    Check out the Training Video below. The PADI Mask Removal and Replacement skill in this video is performed from a student level and not Instructor level. If you perform the PADI Mask Removal and Replacement skill the same as in this video, you will meet the performance requirements of the PADI Open Water Diver Course.

    Please SUBSCRIBE to our Scuba Diving Tips YouTube Channel

    If you want to know how to perform the PADI Scuba Mask Removal Skill in different positions then check this video here:

    Having the best scuba mask makes it much more easier to perform a mask removal skill. So what is the best scuba mask for you? Well, that depends on a few factors. What kind of latex and seal do you prefer? A bit of a hard seal or a soft liquid skin seal? What kind of vision do you prefer?

    In the beginning I recommend that you choose a mask with a nice soft latex seal, good vision and easy to take off. We highly recommend you to invest in a scuba mask as your first dive equipment piece and already use it on your PADI Open Water Diver Course. Please check out this selection of excellent scuba diving masks:

    Liquid Skin Mares

    Liquid Skin Mask – Mares

    Synergy Scuba Pro

    Synergy Mask – Scuba Pro

    MaxLux Mask Beuchat

    MaxLux Mask – Beuchat

    Next Skill: Mask Removal and Replacement for 1 Minute

  • No Mask Breathing at the Surface

    No Mask Breathing at the Surface

    Do you struggle with Mask Clearing? Then try No Mask Breathing at the surface first! No Mask Breathing is an amazing trick that can help you later perform any scuba mask clearing skills more easier.

    No Mask Breathing at the Surface
    No Mask Breathing at the Surface

    This is an old school trick that many diving instructors use and it works fantastically. At the very beginning of the confined open water or scuba diving pool session, have student divers wear their diving masks around their necks and breathe in shallow water from their regulators with just their faces in the water. This is best to do before you start the confined dive briefing so students don’t see it as a difficult skill, but just a fun activity.

    Tip for No Mask Breathing at the Surface

    My tip is to not relate this No Mask Breathing on the Surface to the mask removal and replacement skill or any other another mask skills that you will be teaching soon. Just say it’s to get comfortable breathing through the regulator. Using the No Mask Breathing on the Surface technique it is very easy to recognise if someone is breathing through their nose as they will instantly stand up. If you already used my first tip then you already have selected the potential problem students, I advise you to stay close to them as that lowers their fear-levels significantly.

    Check out the No Mask Breathing Video here:

    Please SUBSCRIBE to our Scuba Diving Tips YouTube Channel

    If someone does stand up after breathing some water up the nose, then wave it off with a friendly laugh and get them to repeat it. Do this quickly, as waiting too long or talking too much about it will only put the fear into their minds. Once the brain records something as scary it will be much harder to overcome.

    If a diving student keeps having a hard time just breathing through their mouths instead of their nose, then I recommend you hold their shoulders gently and close their nose for them for around 45 seconds and then slowly let go of the nose while still holding their shoulder to reassure them. It is very important that your scuba diving student keeps their ears above the water to be able to listen to your advice. Giving advice with a gentle and calming voice while performing No Mask Breathing on the Surface will work fantastically as it helps relax the student.

    Best Scuba Mask to have

    Many dive shops will include a free scuba mask in your scuba diving package, but we highly recommend you to get your own scuba mask as it can create a much better seal. Here we made a selection for you for the best scuba mask own:

    X-Vision Mask Mares

    X-Vision Mask – Mares

    F1 Mask Cressi

    F1 Mask – Cressi

    Synergy Mask -Scuba Pro

    Synergy Mask -Scuba Pro

    Next Skill: PADI Buoyancy Check at the Surface

  • PADI ​Buoyancy Check Scuba at the Surface

    How to check your buoyancy and weight distribution at the surface for the PADI Open Water Diver Course is easy. Doing a good buoyancy check scuba is important to make sure that you enjoy your dive better. Having great buoyancy helps to stay of the bottom, not damage aquatic life, is better for your air consumption and so much more.

    buoyancy check at the surface

    Buoyancy control has a lot to do with having the right weight distribution. By performing this padi buoyancy check you can easily find out if you have this right buoyancy and weights.

    PADI Buoyancy Check steps

    1. Make sure your have your scuba mask on your face

    2. Put your regulator in your mouth

    3. At the surface deflate your BCD fully, while holding a full breath (holding your breath at the surface is ok, make sure you NEVER do this underwater)

    4. While holding a full breath, with a deflated BCD, you should float at eye level

    Check out the Buoyancy check scuba video here:

    Please SUBSCRIBE to our Scuba Diving Tips YouTube Channel

    It is important to do a buoyancy check before every dive. Just remember that you have a full scuba cylinder that is more heavier before the dive than after the dive. It also depends if you are diving on a steel tank or Aluminum tank. Some people prefer to do a second buoyancy check after the scuba dive as they say it is better on an almost empty cylinder. Try different styles yourself to see what is best.

    You will practice the PADI Buoyancy Check during confined water dive 1 of the PADI Open Water Diver Course. This is the Performance Requirement of the PADI Instructor Manual:

    Adjust for proper weighting – float at eye level at the surface with no or minimal air in the BCD and while holding a normal breath.

    Learn more on how to become a PADI Dive Instructor β€‹

    Good buoyancy control is all about owning the right BCD and having the right amount of weights. Check out this Scuba BCD and weights that we recommend you to invest in improve your buoyancy:

    Cressi Start Pro BCD

    Cressi Start Pro BCD

    Next Skill: Orally Inflate BCD at The Surface