
How To Assemble Dive Equipment the right way is important for safety and it can improve your Diving Experience Significantly!
It is important that you learn this skill because you need to assemble dive equipment before every dive and also as a scuba diving skill during the Open Water Diver Course. During the Divemaster and IDC Course you need to demonstrate How To Setup Dive Gear in Divemaster and IDC skill circuit.
There are different styles on How To Assemble Dive Equipment, in the video below we follow these steps:
1. Inspect the tank, visual inspection sticker and the hydrostatic test date
2. Check the O-Ring
3. Open the tank valve and give a little burst to clean the valve
4. Put the BCD correctly over your scuba cylinder
5. At least 4 fingers from the top
6. Attach the Safety Strap
7. Make sure everything is attached correctly
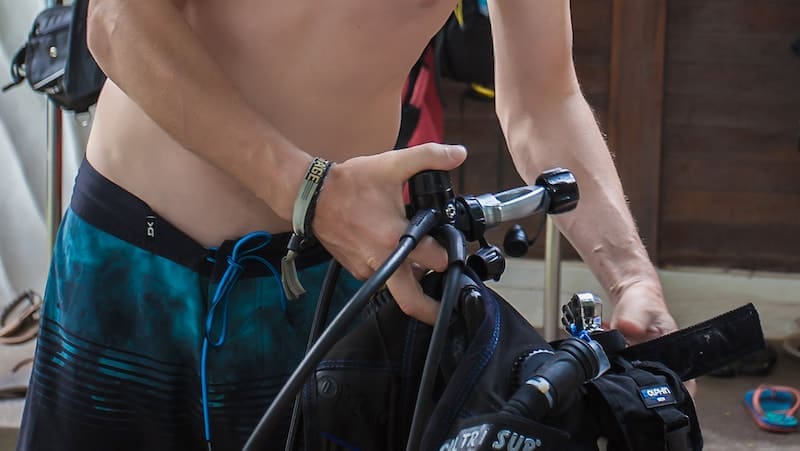
8. Grab your regulator and unscrew the dust cap from the first stage
9. Place the first stage over the valve
10. Gently screw the first stage on the tank valve (Only 3 finger tight)
11. Attach the low-pressure inflator hose to the BCD
12. Attach the alternate air source
13. Streamline everything
14. Turn the SPG glass away from anyone
15. Slowly open up the tank valve
16. Finished
After finishing Assembling the Dive Equipment, you should do a full dive equipment check up:
1. Fully inflate the BCD to check for leaks and the LPI
2. Orally Inflate the BCD
3. Purge, smell and breath through the second stage, while checking the SPG
4. Check the alternate air source
5. Make sure the dive equipment is streamlined
6. Gently place your equipment on its side
How To Assemble Dive Equipment becomes much more easier after a few tries. It is still very important to do a buddy check after you assemble the dive gear to make sure you setup your dive gear correctly.
Check out this video on How To Assemble Dive Equipment 👇
Please SUBSCRIBE to our Scuba Diving Tips YouTube Channel
In this video we used the Scuba Pro Glide BCD, which is one of the most comfortable Scuba BCD’s on the Market. We also used the Scuba Pro MK25 Regulator which delivers more the 10.000 liters of air per minute for the easiest breathing feeling. Are you looking for a new BCD or Regulator? Then we highly recommend these 2 models:

Scuba Pro Glide BCD
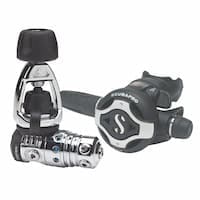
Scuba Pro MK25 / 620 Ti Regulator
Next Skill: Buddy Check – BWRAF
Frequently Asked Questions About Assembling Dive Equipment
What are the essential steps to assemble scuba diving equipment?
Assembling scuba diving equipment involves several critical steps to ensure safety and functionality:
- Inspect the Cylinder: Check the visual inspection sticker and hydrostatic test date to ensure the tank is within the valid inspection period.
- Check the O-Ring: Ensure the O-ring on the tank valve is present and in good condition.
- Purge the Valve: Briefly open the tank valve to clear any debris or moisture.
- Attach the BCD: Slide the BCD onto the cylinder, positioning it so the top of the BCD aligns with the tank valve. Secure the BCD using the tank strap, ensuring it’s tight and the BCD doesn’t move.
- Connect the Regulator: Remove the dust cap from the regulator’s first stage. Attach the first stage to the tank valve, aligning it properly, and tighten securely (finger-tight for yoke connections or as specified for DIN connections).
- Attach Hoses: Connect the low-pressure inflator hose to the BCD’s inflator. Ensure all hoses are routed correctly and are not twisted or kinked.
- Open the Tank Valve: Slowly open the tank valve fully to pressurize the system.
- Check the SPG: Verify the tank pressure is adequate for the planned dive.
- Test the Regulator: Purge and breathe from both the primary and alternate second stages to ensure proper function.
- Inflate the BCD: Use the inflator to add air to the BCD, checking for leaks and ensuring the inflator and dump valves function correctly.
- Streamline Equipment: Secure all hoses and accessories to prevent entanglement and ensure easy access during the dive.
- Final Check: Lay the assembled gear on its side to prevent it from falling over and conduct a final inspection before donning the equipment.
Following these steps helps ensure that your dive equipment is assembled correctly, promoting safety and comfort during your dive.
Leave a Reply