Scuba Diving Tips

Category: PADI Open Water Diver Course

Everything you need to know about the PADI Open Water Diver certification.

  • PADI CESA Skill – Controlled Emergency Swimming Ascent

    PADI CESA Skill – Controlled Emergency Swimming Ascent

    The PADI CESA skill in the PADI Open Water Diver Course is one of the most important scuba skills to perform correctly and safely. Many people overthink the PADI CESA Skill. Still, in the end, it can be performed easily and safely by just following a few easy steps.

    CESA Controlled Emergency Swimming Ascent
    CESA – Controlled Emergency Swimming Ascent

    Why do we practice the CESA – Controlled Emergency Swimming Ascent?

    The reason why we practice the PADI CESA Skill for real life is that in the unlikely event you run out of air as a Scuba Diver and your dive buddy is too far away, you can still make a safe ascent to the surface.

    When do we practice the PADI CESA Skill?

    You need to complete the PADI CESA Skill twice during the PADI Open Water Diver Course. Once during Confined Water Dive 3 and as a flexible skill during Open Water Dive 2 or 3 or 4 of the PADI Open Water Course.

    During Open Water Dive 2 or 3 or 4 we perform the PADI CESA vertically from 6 to 9 meters to the surface. Before we practice the PADI CESA Skill vertically in the Open Water we like to practice it first horizontally in confined water for at least 9 meters, just to be sure we are ready for the open water.

    Confined open water is a swimming pool or open water site that offers swimming-pool-like conditions with respect to clarity, calmness, and depth.

    PADI CESA skill
    PADI CESA Skill in Confined Water

    How to perform the PADI CESA Skill in Confined Water

    1. Start by being neutrally buoyant, simulate the ascent position, with your right above your head and your left hand on the deflator button

    2. Take a couple of deep breaths

    3. Whenever you are ready, take a final breath in and start swimming slowly while exhaling continuously by making an aaaaaaaaaaah sound

    4. Keep swimming slowly with-out touching the bottom or the surface

    5. Keep exhaling making that continuous sound

    6. Swim for at least 9 meters until the CESA is Finished​In this video, we show how to do the CESA correctly in a swimming pool during confined dive 3 of the PADI Open Water Diver Course. We show this from a perfect diving student level:

    Please SUBSCRIBE to our Scuba Diving Tips YouTube Channel

    The CESA is part of Confined Water Dive 3, and the Performance Requirement / Objective from the PADI Instructor Manual is: 

    Simulate a controlled emergency swimming ascent by swimming horizontally for at least 9 metres/30 feet while emitting a continuous sound.

    If you are a PADI Dive Instructor and you want to teach this Skill then check out this article we wrote on How To Teach The PADI CESA – Controlled Emergency Swimming Ascent Skill.

    Dive Equipment for the CESA

    Great dive equipment to have for the PADI CESA Skill is a good scuba regulator, BCD and Fins. Have a look at the items below as they are some of the best dive gear to have:

    MK25 Regulator Scuba Pro

    MK25 Regulator – Scuba Pro

    Hydros BCD Scuba Pro

    Hydros BCD – Scuba Pro

    Seawing Fins Scuba Pro

    Seawing Fins – Scuba Pro

    Frequently Asked Questions About the PADI Controlled Emergency Swimming Ascent (CESA)

    What is the PADI Controlled Emergency Swimming Ascent (CESA)?

    The Controlled Emergency Swimming Ascent (CESA) is a critical scuba diving skill taught in the PADI Open Water Diver course. It is designed for situations where a diver runs out of air and cannot access an alternate air source. The CESA enables a diver to ascend safely to the surface while continuously exhaling, thereby preventing lung over-expansion injuries.

    When is the CESA performed during PADI training?

    In the PADI Open Water Diver course, the CESA is practiced in both confined water and open water settings. Initially, students perform a horizontal CESA in confined water, swimming at least 9 meters (30 feet) while exhaling continuously. Subsequently, during Open Water Dive 2, 3, or 4, students execute a vertical CESA from a depth of 6 to 9 meters (20 to 30 feet) to the surface.

    What are the steps to perform a CESA?

    1. Start Neutrally Buoyant: Begin in a neutrally buoyant state at the designated depth.
    2. Positioning: Place your right hand over your head to protect it and your left hand on your BCD’s deflator button.
    3. Final Breath: Take a deep breath and remove your regulator from your mouth.
    4. Ascent: Swim slowly towards the surface, exhaling continuously by making an “ahhh” sound to ensure a steady release of air.
    5. Maintain Control: Keep your ascent rate within safe limits, not exceeding 18 meters (60 feet) per minute.
    6. Surface Actions: Upon reaching the surface, inflate your BCD orally to establish positive buoyancy.

    Why is continuous exhalation important during a CESA?

    Continuous exhalation during ascent prevents lung over-expansion injuries. As a diver ascends, the ambient pressure decreases, causing the air in the lungs to expand. Exhaling continuously allows this expanding air to escape safely, reducing the risk of pulmonary barotrauma.

    What equipment is recommended for practicing the CESA?

    For effective practice of the CESA, it’s advisable to use reliable scuba gear, including a well-maintained regulator, a buoyancy control device (BCD), and appropriate fins. High-quality equipment ensures safety and comfort during training exercises.

    Next Skill: Hover Orally Inflate for 1 Minute

  • How To Assemble Dive Equipment

    How To Assemble Dive Equipment

    How To Assemble Dive Equipment the right way is important for safety and it can improve your Diving Experience Significantly! 

    It is important that you learn this skill because you need to assemble dive equipment before every dive and also as a scuba diving skill during the Open Water Diver Course. During the Divemaster and IDC Course you need to demonstrate How To Setup Dive Gear in Divemaster and IDC skill circuit.

    How To Assemble Dive Equipment
    How To Assemble Dive Equipment

    There are different styles on How To Assemble Dive Equipment, in the video below we follow these steps:

    1. Inspect the tank, visual inspection sticker and the hydrostatic test date

    2. Check the O-Ring

    3. Open the tank valve and give a little burst to clean the valve

    4. Put the BCD correctly over your scuba cylinder

    5. At least 4 fingers from the top

    6. Attach the Safety Strap

    7. Make sure everything is attached correctly

    8. Grab your regulator and unscrew the dust cap from the first stage 

    9. Place the first stage over the valve

    10. Gently screw the first stage on the tank valve (Only 3 finger tight)

    11. Attach the low-pressure inflator hose to the BCD

    12. Attach the alternate air source

    13. Streamline everything

    14. Turn the SPG glass away from anyone

    15. Slowly open up the tank valve

    16. Finished

    After finishing Assembling the Dive Equipment, you should do a full dive equipment check up:

    1. Fully inflate the BCD to check for leaks and the LPI

    2. Orally Inflate the BCD

    3. Purge, smell and breath through the second stage, while checking the SPG

    4. Check the alternate air source

    5. Make sure the dive equipment is streamlined

    6. Gently place your equipment on its side

    How To Assemble Dive Equipment becomes much more easier after a few tries. It is still very important to do a buddy check after you assemble the dive gear to make sure you setup your dive gear correctly.

    Check out this video on How To Assemble Dive Equipment πŸ‘‡

    Please SUBSCRIBE to our Scuba Diving Tips YouTube Channel

    In this video we used the Scuba Pro Glide BCD, which is one of the most comfortable Scuba BCD’s on the Market. We also used the Scuba Pro MK25 Regulator which delivers more the 10.000 liters of air per minute for the easiest breathing feeling. Are you looking for a new BCD or Regulator? Then we highly recommend these 2 models:

    Scuba Pro Glide BCD

    Scuba Pro Glide BCD

    Scuba Pro MK25 / 620 Ti Regulator

    Scuba Pro MK25 / 620 Ti Regulator

    Next Skill: Buddy Check – BWRAF

    Frequently Asked Questions About Assembling Dive Equipment

    What are the essential steps to assemble scuba diving equipment?

    Assembling scuba diving equipment involves several critical steps to ensure safety and functionality:

    1. Inspect the Cylinder: Check the visual inspection sticker and hydrostatic test date to ensure the tank is within the valid inspection period.
    2. Check the O-Ring: Ensure the O-ring on the tank valve is present and in good condition.
    3. Purge the Valve: Briefly open the tank valve to clear any debris or moisture.
    4. Attach the BCD: Slide the BCD onto the cylinder, positioning it so the top of the BCD aligns with the tank valve. Secure the BCD using the tank strap, ensuring it’s tight and the BCD doesn’t move.
    5. Connect the Regulator: Remove the dust cap from the regulator’s first stage. Attach the first stage to the tank valve, aligning it properly, and tighten securely (finger-tight for yoke connections or as specified for DIN connections).
    6. Attach Hoses: Connect the low-pressure inflator hose to the BCD’s inflator. Ensure all hoses are routed correctly and are not twisted or kinked.
    7. Open the Tank Valve: Slowly open the tank valve fully to pressurize the system.
    8. Check the SPG: Verify the tank pressure is adequate for the planned dive.
    9. Test the Regulator: Purge and breathe from both the primary and alternate second stages to ensure proper function.
    10. Inflate the BCD: Use the inflator to add air to the BCD, checking for leaks and ensuring the inflator and dump valves function correctly.
    11. Streamline Equipment: Secure all hoses and accessories to prevent entanglement and ensure easy access during the dive.
    12. Final Check: Lay the assembled gear on its side to prevent it from falling over and conduct a final inspection before donning the equipment.

    Following these steps helps ensure that your dive equipment is assembled correctly, promoting safety and comfort during your dive.

  • Regulator Recovery and Clearing

    Regulator Recovery and Clearing

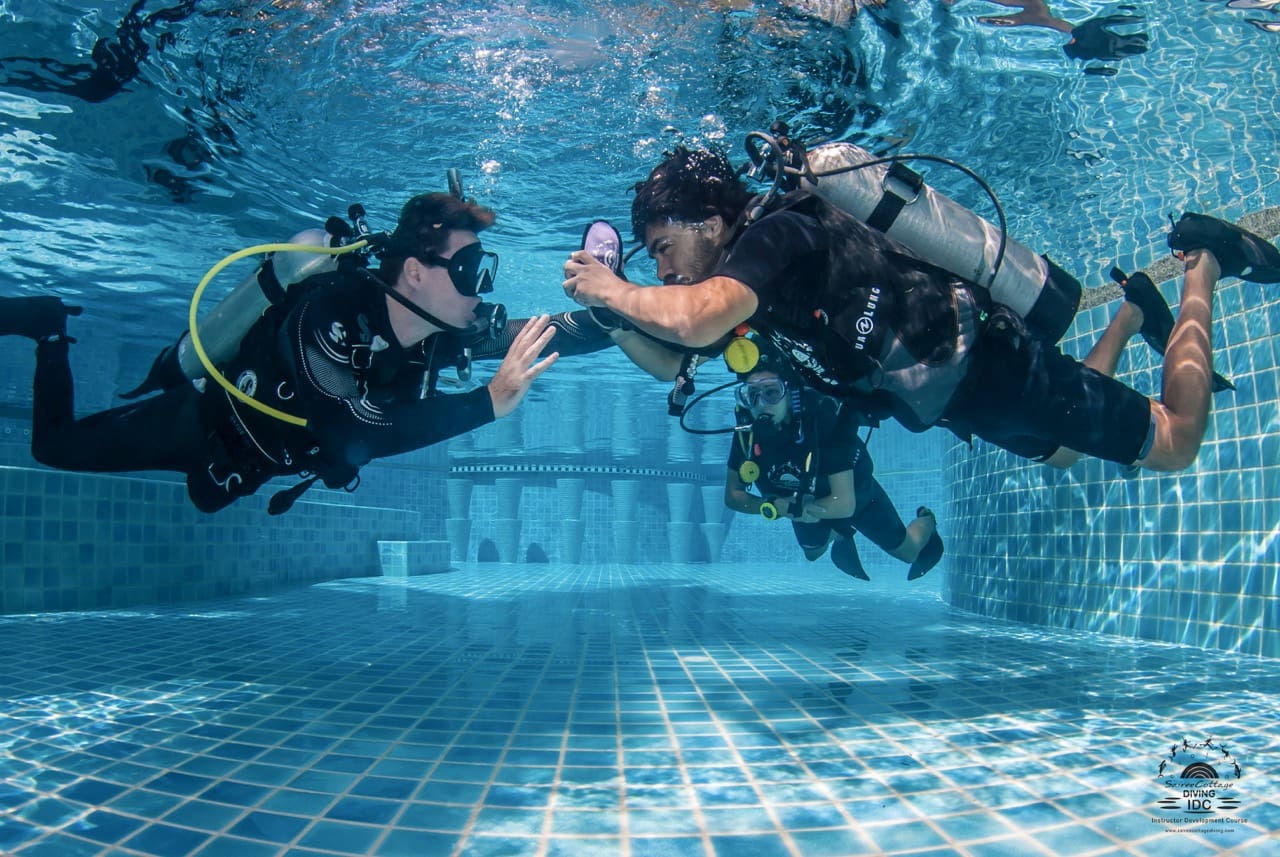
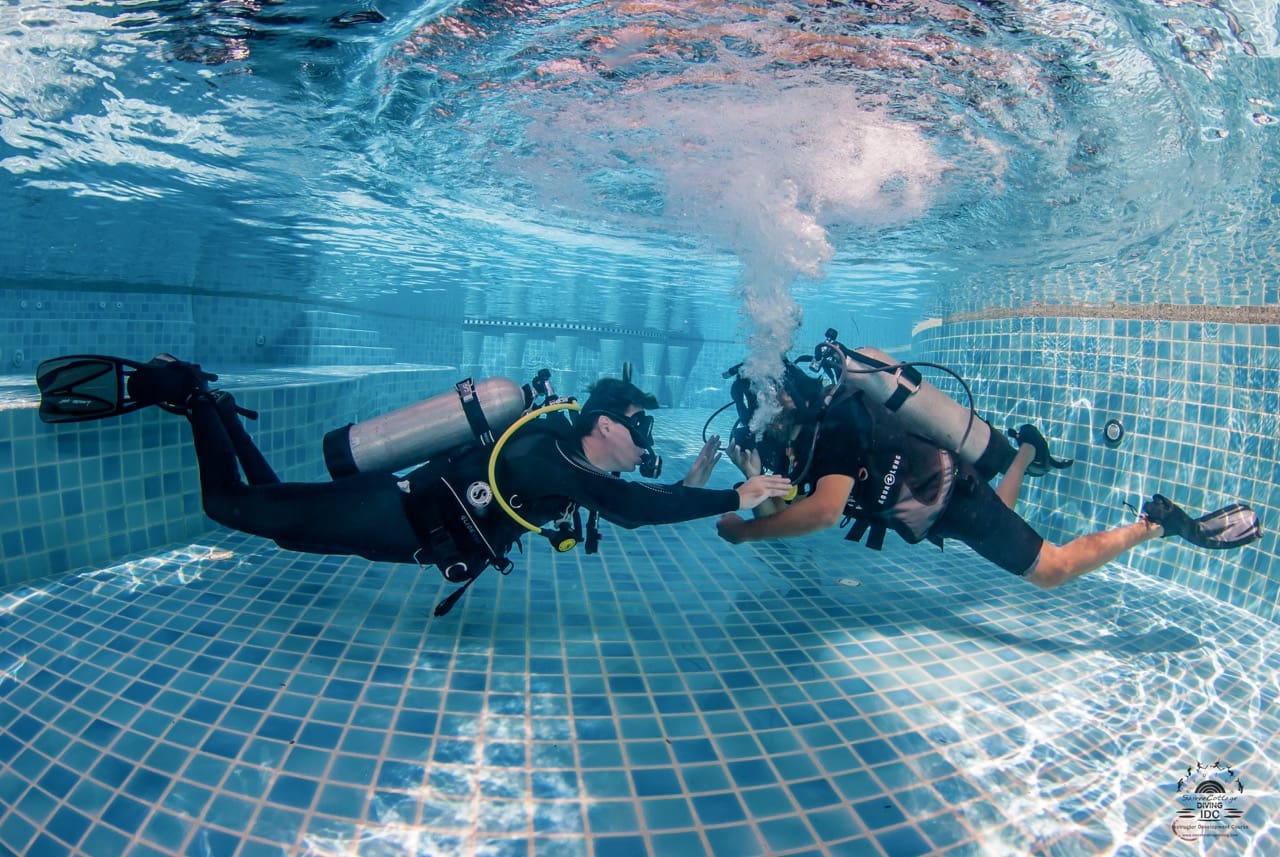
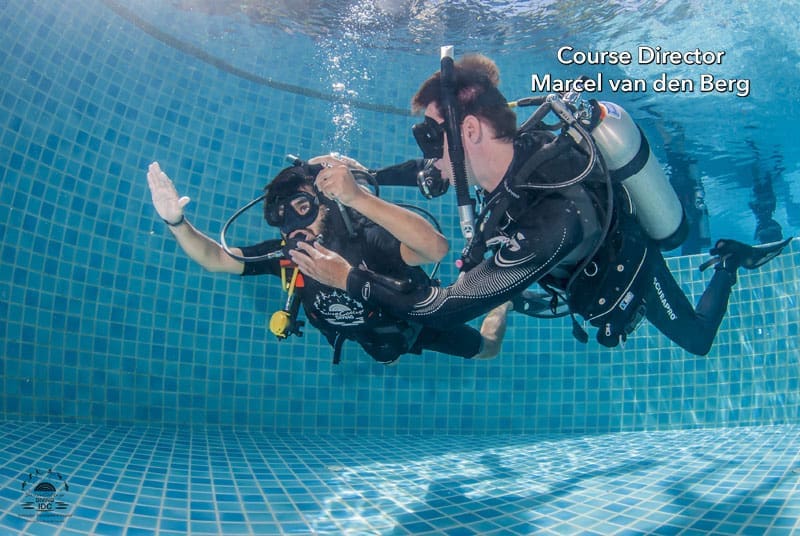
    The Regulator Recovery and Clearing is another famous PADI Open water Diver course skill. It is also one of the first skills that you will do in Confined Water Dive 1. The PADI Regulator Recovery and Clearing skill is surprisingly easy to do, however many new scuba divers are nervous for this skill.

    Regulator Removal and Clearing
    Regulator Removal and Clearing

    The reason why some new scuba divers are nervous to perform the Regulator Recovery and Clearing skills that it involves taking your regulator second stage out and dropping it next to you. For the first time you have no mouth piece in your mouth, and you feel a bit out of control not holding it in your hands like in the previous regulator clearing 2 Methods skill.

    Don’t worry as you will find out that the Regulator Recovery and Clearing is easy to perform and you will have a lot of time to recover your regulator. The trick is to blow small bubbles from your mouth when you remove the scuba regulator. 

    The smaller the bubbles the longer you have to recover the second stage. The reason why we blow small bubble is that you can never hold your breath underwater. We solves this by exhaling small bubble instead of holding our breath.

    Learn here how to teach the PADI Regulator Removal, Recovery and Clearing Skill as a PADI Dive Instructor

    Check out this video about the PADI Regulator Removal and Recovery Briefing:

    Steps for the PADI Regulator Recovery and Clearing Skill

    1. Take a deep breath in

    2. Take out the regulator, have the mouth piece down and blow bubbles

    3. Move your hand to the right and drop the regulator behind the shoulder

    4. Lean right, stretch your right arm, touch your knee, the tank and slide your arm in a sweep forward

    5. Catch your regulator on your right arm

    6. Recover the regulator, make sure it’s the right way up

    7. Replace the regulator in your mouth

    8. Clear it either way you like it, by exhaling or purging

    9. Resume breathing

    Check out the Regulator Recovery and Clearing video here:

    Please SUBSCRIBE to our Scuba Diving Tips YouTube Channel

    Would you also like to own your own scuba regulator then check out our 3 scuba regulator recommendations:

    Aqua Lung Legend Regulator

    Aqua Lung Legend Regulator

    Scuba Pro MK25 Regulator

    Scuba Pro MK25 Regulator

    Apex XTX 50 Regulator

    Apex XTX 50 Regulator

    Next Skill: Partially Flooded Mask

    Frequently Asked Questions About Regulator Recovery and Clearing

    What is regulator recovery and why is it important?

    Regulator recovery is a fundamental scuba diving skill that enables a diver to retrieve their regulator if it becomes dislodged underwater. Mastering this skill ensures that divers can maintain access to their air supply in unexpected situations, enhancing safety and confidence during dives.

    How do you perform the sweep method for regulator recovery?

    To execute the sweep method:

    1. Exhale continuously to prevent breath-holding.
    2. Lean to the right, allowing the regulator to dangle.
    3. Extend your right arm downward, touching your thigh.
    4. Sweep your arm back along your leg and then outwards in a wide arc.
    5. Catch the regulator hose on your arm and guide the mouthpiece to your mouth.
    6. Clear the regulator before resuming breathing.

    This method is widely taught in scuba courses and is effective for quickly retrieving a lost regulator.

    What are the two methods for clearing a regulator underwater?

    There are two primary techniques:scubadivingtips.net

    • Blast Clear: Forcefully exhale into the regulator to expel water.
    • Purge Button Clear: Press the purge button on the regulator to release a burst of air, clearing water from the mouth piece

    Both methods are effective, and divers should practice each to determine personal preference.

    Why is continuous exhalation emphasized during regulator recovery?

    Continuous exhalation prevents lung over-expansion injuries by ensuring that expanding air escapes as pressure decreases. It also helps maintain buoyancy and composure during the recovery process.

    How can divers overcome anxiety related to regulator recovery?

    Building comfort with regulator recovery involves:reddit.com

    • Regular practice in controlled environments.
    • Gradual progression, starting with holding the regulator before letting it go.
    • Visualization techniques to mentally rehearse the skill.
    • Seeking guidance from instructors to address specific concerns.

    Consistent practice and support can significantly reduce anxiety associated with this skill.

  • How To Clear Mask When Scuba Diving

    How To Clear Mask When Scuba Diving

    How to clear a mask when scuba diving is for many new scuba divers the hardest diving skill to complete in their diving course. However, in many cases people overthink it and with some practice and a good diving instructor this skill is not so hard to master.

    First of all I recommend you to not overthink the how to clear a scuba mask skill. In the end you breath into your mouth and out of your nose to clear it. But as soon as you start to overthink it, you start to worry. This leads to loss of confidence and when we loose confidence we have a tendency to shake, not think clearly and sometimes do the opposite of what we want to do. In this case we see new diving students breath into their nose instead of their mouth. If this happens you get water in your throat and that leads to panic.

    How to clear a scuba mask
    Clearing a Partially Flooded Mask

    So we learn that confidence is key in completing the mask clearing skill while scuba diving. In the PADI Open Water Diver Course you will be practicing how to clear your scuba mask many times to ensure mastery before getting your diving certification.

    In the PADI Open Water course you will practice the mask skills first in confined shallow  water. This makes it easy for you to stand up if somethings go wrong and it makes people relax knowing they can stand up if needed. In confined water you will practice in order: Partially Flooded Mask, Fully Flooded Mask, Mask Removal and ReplacementMask Removal and Replacement breathing for 1 minute and No Mask Swim. Then on the open water dives you will repeat: Partially Flooded Mask, Fully Flooded Mask and Mask Removal and Replacement. All these mask skills need to be completed in a comfortable, fluid and most importantly repeatable manner to ensure completion of the course and achieving your PADI Certification. 

    Please SUBSCRIBE to our Scuba Diving Tips YouTube Channel

    Here are some easy tips and trick on How To Clear Mask When Scuba Diving

    1. Remain calm and think that it will feel the same as putting your face under the shower

    2. Believe that this skill is easy, and it is in a way. Into your mouth and out of your nose

    3. Put water in the scuba mask from the bottom and not the top of the scuba mask

    4. Put water just under eye level

    5. Try NOT to look down, like many scuba dive instructors teach, just look forward

    6. Important: Just tilt your head SLIGHTLY up, 

    7. Take a relaxed and MOST important slow breath into your mouth

    8. Exhale through your nose, while again just slightly looking up

    9. If there is still some water in the scuba mask, then relax and repeat breathing out of your nose until the mask is clear.

    This is How To Clear a Mask When Scuba Diving in an Easy Way.

    If you are a Diving Instructor then check out this article with great tips on how to teach the scuba clearing skills

    Improve your mask clearing skills by owning your own scuba mask

    Owning your own scuba mask is great as it will fit you much better than most rental masks. It is very easy to travel with a scuba mask, much more hygienic and the latex will seal much better on your face. This prevents the mask from leaking and good latex will also make it much easier to clear it from water. Have a look at these 3 masks I recommend you get:

    Mares Liquid Skin Partially Flooded Mask

    Mares Liquid Skin

    Cressi F1

    Cressi F1

    Scuba Pro Synergy

    Scuba Pro Synergy

    Next Skill: Alternate Air Source

    Frequently Asked Questions About Clearing a Partially Flooded Scuba Mask

    Why is it important to learn how to clear a partially flooded scuba mask?

    Mastering this skill ensures uninterrupted vision and comfort underwater. It enhances safety by preventing panic and allows divers to handle unexpected water ingress confidently.

    What causes a scuba mask to partially flood during a dive?

    Common causes include an improper fit, facial movements breaking the seal, stray hair under the skirt, or accidental bumps dislodging the mask.

    What are the steps to clear a partially flooded scuba mask?

    1. Remain calm and maintain steady breathing through your mouth using the regulator.
    2. Gently press the top of the mask against your forehead to create a seal.
    3. Tilt your head slightly upward.
    4. Exhale slowly and steadily through your nose to expel the water from the bottom of the mask.
    5. If water remains, repeat the process until the mask is clear.

    Should I close my eyes while clearing the mask?

    If you’re wearing contact lenses or have sensitive eyes, it’s advisable to close your eyes to prevent irritation from saltwater.

    How can I practice mask clearing skills?

    Begin in a shallow pool or controlled environment. Practice flooding and clearing your mask incrementally, starting with small amounts of water. Gradually increase to full floods as you build confidence. Consistent practice will enhance your comfort and proficiency.

    What if I struggle with clearing my mask underwater?

    It’s common for new divers to face challenges. Regular practice, focusing on calm and controlled breathing, and seeking guidance from a certified instructor can help overcome difficulties.

    Can owning a personal scuba mask help with clearing issues?

    Yes, a well-fitted personal mask reduces the likelihood of leaks and makes clearing easier. It also enhances overall comfort and hygiene compared to rental masks.

    Are there any tips to make mask clearing more effective?

    • Ensure the mask skirt is free from hair and properly sealed against your face.
    • Avoid overtightening the mask strap, which can cause discomfort and leaks.
    • Practice the skill regularly to build muscle memory and confidence.

    Is mask clearing covered in scuba certification courses?

    Absolutely. Mask clearing is a fundamental skill taught in entry-level scuba certification courses, such as the PADI Open Water Diver course, to ensure divers can handle water ingress safely.

    What should I do if I panic during mask clearing?

    If you feel overwhelmed, signal your buddy or instructor, ascend if necessary, and take a moment to regroup. With time and practice, your confidence will grow, reducing panic responses.

  • Scuba Diving Regulator Clearing Two Methods

    Scuba Diving Regulator Clearing Two Methods

    ​The Scuba Diving Regulator Clearing Two Methods Skill is part of the PADI Open Water Diver course. It is one of the first scuba diving skills you will learn and also one of the most used skills in diving.

    Scuba Regulator Clearing 2 Methods

    You want to remove any water every time you get a bit of water in your scuba regulator. You can easily do that using the PADI Regulator Clearing 2 Methods. Another reason why this skill is great to learn is when you take out your scuba regulator to perform a skill. Every time you remove your scuba regulator from your mouth it will fill up with water. With the PADI regulator clearing skill you can easily clear it from water.

    There are 2 methods of clearing your scuba regulator. One method is to forcefully exhale or spit through your second stage and the second method is to use the purge button.

    PADI Scuba Diving Regulator Clearing Two Methods Skill Video:

    Please SUBSCRIBE to our Scuba Diving Tips YouTube Channel

    Steps for the PADI Scuba Diving Regulator Clearing Two Methods Skill

    1. For the first method take a deep breath 

    2. Take out your regulator

    3. Remember to have the mouth piece down and blow bubbles

    4. Keep holding onto the regulator

    5. Put the regulator back in your mouth

    6. Clear it by exhaling forcefully (Like a spit)

    7. For the second method take another deep breath

    8. Remember to have the mouth piece down and blow bubbles

    9. Keep holding onto the regulator

    10. Use your tongue as a “splash guard” 

    11. Clear the regulator by gently pressing the purge button

    Learn more about the Regulator Removal & Replacement Skill for PADI IDC Course

    Best Scuba Regulator to own

    Having your own scuba regulator will be one of the best pieces of dive equipment you will buy. Owning your own regulator has many benefits like, much better breathing experience, cleaner and it is easy to travel with. A regulator is the main piece of dive equipment that make breathing underwater possible. Knowing that you personally take care if it and service it can be a peace of mind when scuba diving. There are many regulators to choose from, but here are our 3 recommendations:

    Scuba Pro MK25

    Scuba Pro MK25

    Aqua Lung Legend

    Aqua Lung Legend

    Apex XTX 50

    Apex XTX 50

    Next Skill: Regulator Removal, Recover and Clearing

    Frequently Asked Questions About Scuba Regulator Clearing

    Why is it important to learn regulator clearing techniques?

    Learning regulator clearing is essential because water can enter your regulator during dives, especially when removing it for skills practice or if it’s accidentally dislodged. Being proficient in clearing ensures you can resume breathing safely and comfortably underwater.

    What are the two methods for clearing a scuba regulator?

    1. Exhalation Method: After reinserting the regulator into your mouth, forcefully exhale to expel water from the mouthpiece.
    2. Purge Button Method: Press the purge button on the front of the regulator to release a burst of air, clearing water from the mouthpiece.

    When should I use each clearing method?

    • Exhalation Method: Ideal when you have sufficient air in your lungs and prefer a quieter approach.
    • Purge Button Method: Useful when low on breath or if exhalation doesn’t effectively clear the water.

    How do I perform the exhalation method correctly?

    1. Take a deep breath.
    2. Remove the regulator, keeping the mouthpiece facing downward.
    3. Blow bubbles continuously to prevent water entry.
    4. Reinsert the regulator into your mouth.
    5. Forcefully exhale to clear the water.

    How do I perform the purge button method correctly?

    1. Take a deep breath.
    2. Remove the regulator, keeping the mouthpiece facing downward.
    3. Blow bubbles continuously to prevent water entry.
    4. Reinsert the regulator into your mouth.
    5. Use your tongue as a splash guard.
    6. Gently press the purge button to clear the water.

    Are there any tips to make regulator clearing easier?

    • Always keep the mouthpiece facing downward when removing the regulator to minimize water entry.
    • Practice both methods regularly to build confidence and muscle memory.
    • Use your tongue to block water from entering your throat during clearing.

    Is regulator clearing taught in the PADI Open Water Diver course?

    Yes, regulator clearing is a fundamental skill taught early in the PADI Open Water Diver course. Students practice both methods to ensure they can handle situations where water enters the regulator.

  • Weight Belt Removal and Replacement Underwater

    Weight Belt Removal and Replacement Underwater

    Knowing how to perform the PADI Weight Belt Removal and Replacement Underwater Skill can be handy when you need to adjust your weights underwater. It is rare to adjust weights underwater, but it can happen. You also might want to give an extra weight to another diver or your buddy if they need it.

    Weight Belt Removal and Replacement Underwater

    PADI Weight Belt Removal and Replacement Underwater Skill

    You will learn the Weight Belt Removal and Replacement Skill during PADI Confined Water Dive 5 of the PADI Open Water Course. This is the performance requirement in the PADI Instructor Manual:

    Remove, replace, adjust and secure all or part of the weight system without losing control of buoyancy, body position and depth.

    • With weight belt and weight integrated BCD on the bottom in water too deep in which to stand.
    • With any weight system that requires reassembly after

    In case of an emergency you can also perform another weight belt skill: The Emergency Weight Belt Drop

    Steps for the PADI Weight Belt Removal and Replacement Underwater Skill

    1. Make sure you are fully deflated

    2. Unclip the weight belt

    3. Remove the weight belt

    4. Make sure you hold onto the weight belt

    5. Check if the weight belt is not twisted

    6. Replace the weight belt

    7. Make sure nothing is entangled/stuck in the weight belt 

    8. Secure the weight belt’s quick release

    9. Double check if all your equipment is streamlined

    Watch the How To perform the PADI Weight Belt Removal and Replacement skill video:

    Please SUBSCRIBE to our Scuba Diving Tips YouTube Channel

    Owning your own Weight Belt

    Owning your own Weight Belt is really handy as you can rig the perfect amount of weight on it. This way you never have to adjust your weight belt before and after a dive! On top of that knowing your weight belts quick release buckle can also help you in and emergency or when you just want to adjust your weights underwater.

    Frequently Asked Questions About Weight Belt Removal and Replacement Underwater

    What is the purpose of the weight belt removal and replacement underwater skill?

    This skill is designed to ensure that divers can safely and effectively manage their weight systems underwater. It prepares divers to handle situations where adjusting or removing the weight belt is necessary, such as equipment malfunctions or emergencies, without compromising buoyancy control or body position.

    When is this skill taught during the PADI Open Water Diver course?

    The weight belt removal and replacement underwater skill is typically introduced during Confined Water Dive 5 of the PADI Open Water Diver course. It is a performance requirement outlined in the PADI Instructor Manual.

    What are the steps to perform the weight belt removal and replacement underwater?

    1. Ensure you are fully deflated.
    2. Unclip the weight belt.
    3. Carefully remove the weight belt, maintaining control.
    4. Hold onto the weight belt securely.
    5. Check that the weight belt is not twisted.
    6. Replace the weight belt around your waist.
    7. Ensure nothing is entangled or stuck in the weight belt.
    8. Secure the weight belt’s quick-release buckle.
    9. Double-check that all equipment is streamlined.

    Why is it important to maintain control during this skill?

    Maintaining control ensures that you do not lose buoyancy or body position, which could lead to uncontrolled ascents or descents. It also prevents the weight belt from being lost or causing entanglement.

    What is the emergency weight belt drop, and when should it be used?

    The emergency weight belt drop is a procedure where a diver releases their weight belt to achieve positive buoyancy in critical situations, such as uncontrolled descents or equipment failures. It should be performed only when necessary and when other buoyancy control methods are ineffective.

  • BCD Inflate Deflate skill at the surface

    BCD Inflate Deflate skill at the surface

    The PADI BCD Inflate Deflate skill in the PADI Open Water Diver Course is really important dive skill to master as many new divers have problems with properly deflating the BCD underwater and inflating on the surface.

    Every time we reach the surface after entry or in the end of a dive we should inflate the BCD fully as soon as possible to become neutrally buoyant. From the few accidents that occurs on the surface, most are caused by not being fully buoyant. Water is very dense and trying to swim to stay above the surface can exhaust you very quick. If you are fully inflated you can rest and easily stay on the surface to prevent most accidents. 

    BCD Inflate and Deflate on the Surface

    Underwater we see a lot of new scuba divers having issues with deflating their BCD properly. A lot of times new scuba divers are in the wrong position/angle or have the deflator hose in a wrong position that prevents them from releasing air from the BCD. Therefore it is really important that if you want to release air from the BCD, is that you are in the upright position (vertical, head up, legs down) and that you stretch the BCD deflator as high as possible and the start deflating the BCD.

    Learn more about tips for perfect buoyancy underwater

    How to perform the PADI BCD Inflate Deflate skill

    How to perform the PADI BCD Inflate Deflate skill

    1. Make sure you have your mask on and your snorkel in your mouth

    2. Fully inflate your BCD by pushing the inflator button until air releases from your BCD

    3. Lean Backwards

    4. Make sure that you are completely positively buoyant

    5. Float a bit

    6. Stand back up make sure you are completely vertical

    7. Stretch that deflator hose as high as you can

    8. Fully deflate your BCD

    9. Use your right hand to squeeze the last remaining air out of your BCD

    10. Simulate that you are going downPlease check out the video below on How to do the BCD Inflate Deflate Skill at the surface:

    Please SUBSCRIBE to our Scuba Diving Tips YouTube Channel

    How easy it is to Inflate or Deflate the BCD usually depends on the inflator button of your low pressure inflator hose on the BCD. On some brand BCD’s the inflator is a bit slow resulting in a longer time to inflate or deflate. We found that the Scuba Pro BCD’s have some of the best and fastest power inflators from all other brands. Have a look at these BCD’s:

    Hydros BCD Scuba ProPicture

    Hydros BCD – Scuba Pro

    Equator BCD Scuba Pro

    Equator BCD – Scuba Pro

    Bella BCD Scuba Pro

    Bella BCD – Scuba Pro

    Frequently Asked Questions About BCD Inflate & Deflate at the Surface

    What is the purpose of inflating and deflating the BCD at the surface?

    Inflating and deflating the Buoyancy Control Device (BCD) at the surface is a fundamental skill in scuba diving. Inflating the BCD provides positive buoyancy, allowing divers to float comfortably on the surface before or after a dive. Deflating the BCD removes air, enabling the diver to descend below the surface. Mastery of this skill ensures safety and control during dives.

    How do you properly inflate the BCD at the surface?

    To inflate the BCD at the surface:

    1. Ensure your mask is on and your snorkel or regulator is in your mouth.
    2. Press the inflator button on the low-pressure inflator hose until the BCD is fully inflated.
    3. Lean back slightly to achieve a comfortable floating position.
    4. Confirm that you are positively buoyant and can float effortlessly.

    What is the correct method to deflate the BCD at the surface?

    To deflate the BCD at the surface:

    1. Stand or maintain an upright position in the water.
    2. Raise the inflator hose above your head to allow air to escape efficiently.
    3. Press and hold the deflate button until air stops releasing.
    4. Use your right hand to gently squeeze the BCD, expelling any remaining air.
    5. Ensure you are neutrally buoyant or slightly negative before beginning your descent.

    Why is mastering BCD inflation and deflation important for divers?

    Proper control of the BCD is crucial for maintaining buoyancy, ensuring safety, and conserving energy during a dive. Mastery of inflation and deflation techniques allows divers to ascend, descend, and maintain desired depths with confidence and control.

    Is this skill practiced during PADI Open Water Diver training?

    Yes, inflating and deflating the BCD at the surface is a core skill taught during the PADI Open Water Diver course. It is typically introduced in Confined Water Dive 1 and reinforced throughout the course to ensure proficiency and safety.

    Next Skill: No Mask Breathing at the Surface

  • PADI Confined Water Dive 3

    PADI Confined Water Dive 3

    You are half way through during PADI Confined Water Dive 3. On this confined dive you will on doing more advanced skills in deeper water and you will learn the famous PADI CESA skill.

    Also during PADI Confined Water Dive 3 you will be practicing buoyancy skills like the Hover. Good buoyancy is one of the most skills in scuba diving. Buoyancy is like a feeling. In the beginning it will be weird but by the end of Confined Dive 3 you will be so much more comfortable with you buoyancy. 

    PADI Confined Water Dive 3
    PADI Confined Water Dive 3

    Tips for the PADI CESA Skill in Confined Water 3

    The PADI CESA Skill is a famous skill that you learn in the PADI Open Water Diver Course. It is an important skill to learn for in the unlikely event you might run out of air then you can still safely reach the surface using this skill from 9 meter depth. before you learn this skill in open water you will first practice the CESA in Confined Water Dive 3.

    The best tips we can give is to not overthink it. It is the same as a normal ascent just with a continuous sounds (exhalation) and in confined you swim diagonal as is not deep enough.

    Tips for Buoyancy Skills in Confined Dive 3

    In dive 1 and 2 you have already swim around and practiced some buoyancy, but in confined dive 3 you will fully focus on your buoyancy and using your lungs with the PADI Hover skill.

    The trick to hover perfectly is to understand that there is a delay in inflating and deflating your lungs. It is true that when you inhale you should rise and when you exhale you should fall (descent). However, because of the delay in filling up your lungs you should almost do it the other way around. let me explain:

    If needed add a bit of air into your BCD and slowly breath in. After a delay you should start to rise slowly. Then the moment you start to rise you start to exhale gently. This makes you slow down in your ascent and makes you fall. The moment you fall start to slowly inhale, this will slow down your descent and with make you go up again. Keep repeating this. I know it is not easy in the beginning, but trust me you will get it with some practice. Learning buoyancy is the same as learning how to ride a bicycle.

    PADI Confined Water Dive 3 Skills in order

    ​Check out the PADI Confined Water Dive 3 Video πŸ‘‡

    Please SUBSCRIBE to our Scuba Diving Tips YouTube Channel

    During confined dive 3 you are becoming a diver and almost ready for the real open water dives. An item that every scuba should have is a diving computer.

    Next: PADI Confined Water Dive 4

  • PADI Confined Water Dive 2

    PADI Confined Water Dive 2

    PADI Confined Water Dive 2 will be your next experience after passing Confined Dive 1. During Confined Dive 2 you will be focussing mostly on the scuba mask skills to get ready for deeper water skills.

    A lot of Dive Instructor will first teach dive 1 and go straight into teaching dive 2, but in some cases you might come back a few days later to complete confined dive 2.

    PADI Confined Water Dive 2
    PADI Confined Water Dive 2

    More confidence in PADI Confined Water Dive 2

    Dive 1 was all about getting used to breathing underwater and feeling relaxed while scuba diving. PADI Confined Water Dive 2 is all about focussing on more advanced scuba skills like the PADI Mask Removal and Replacement skill. Confined Dive 2 also prepares you for Confined Dive 3.

    Scuba Mask Skills during Confined Dive 2

    Some new scuba diver students worry a bit about the mask clearing skills, especially the Mask Removal, Replacement and Clearing skill. This is not needed as the skills are simple if you stay relaxed and don’t overthink. We wrote some great tips on how to clear a scuba mask here.

    First we recommend you to stay relaxed and know that you are in shallow water, so you can always stand up if you don’t like the skill. Slowly take off your mask and then when you are ready put it back on. The mask will now be full of water. To clear this you just breath into your mouth and then out of your nose while slightly looking up.

    All PADI Confined Water Water Dive 2 Skills in order

    Please SUBSCRIBE to our Scuba Diving Tips YouTube Channel

    You will be practicing a lot of scuba mask clearing skills during Confined Dive 2. We recommend you to get your own to ensure the best seal for your face. We recommend these 3 great scuba diving masks:

    Scuba Pro SYNERGY Mask

    Scuba Pro SYNERGY Mask

    Beuchat Maxlux Mask

    Beuchat Maxlux Mask

    Mares Liquid X-Vision Mask

    Mares Liquid X-Vision Mask

    Next: PADI Confined Water Dive 3

  • PADI Confined Water Dive 4

    PADI Confined Water Dive 4

    PADI Confined Water Dive 4 is one of the last Confined Water Dives, your are almost there! During PADI Confined Water Dive 4 you will focus on finishing the last scuba diving skills before you are ready to learn how to plan a dive in confined dive 5.

    PADI Confined Water Dive 4
    PADI Confined Water Dive 4

    Mostly deep water skills in PADI Confined Water Dive 4

    As you are almost finished with your confined water dives you will be focussing on mostly doing skills in deeper water. Don’t worry it is still confined so you can reach the surface easily if needed. 

    This deeper water during confined dive 4 will make it even easier to do skills like No Mask Swim, Free Flowing Regulator and learning how to swim with proper trim as you have much more space.

    Great buoyancy and Trim is important in Scuba Diving

    During PADI Confined Water Dive 4 you will learn how to fine tune your buoyancy, trim and swimming style for scuba diving.

    Especially during the skill Swimming over a Sensitive Bottom your will learn to control this to improve your diving and stay off the bottom. On your real open water dives you will probably swim over delicate aquatic life and we need to make sure we don’t accidentally touch that.

    Some tips for a good diving position: First of all make sure you are in a horizontal position. Put some air into your BCD and establish neutral buoyancy. Streamline all your diving equipment and your arms. Use and effective fin kick to move forward. Swim at least a few rounds in confined water to get the hang of it. It is a really good feeling when you glide through the water like a professional scuba diver!

    All PADI Confined Water Dive 4 Skills

    Check out the PADI Confined Water Dive 4 Video πŸ‘‡

    Please SUBSCRIBE to our Scuba Diving Tips YouTube Channel

    Learning how to properly use the right fin strokes in PADI Confined Dive 4 is important. having the right fins will make this even easier. Check out our 3 recommendations of fins to have as a scuba diver:

    Mares Avanti Quattro Fins

    Mares Avanti Quattro Fins

    Scuba Pro Jet Sport Fins

    Scuba Pro Jet Sport Fins

    Scubapro Seawing

    Scuba Pro Seawing Fins

    Next: PADI Confined Water Dive 5